Showing posts with label toy. Show all posts

Saturday, July 30, 2016

Portable Racing Car Play Mat

The three year old boy of the house has recently gone through a sudden change. Up until now he has happily played his big sister's games while wearing an old dress that belonged to me as a child. But now a fascination of all things with wheels has arrived and a collection of Hot Wheels and Matchbox cars has materialised out of what seems like nowhere.

The racing car mat began on a Sunday afternoon as a few ideas that looked something like this below.


Some felt and cotton fabric (how cute is that racing car fabric?!?!!) and a little refining and it became this -


Three cars can be parked in the pockets at the top. They can line up at the starting line and drive around in laps, stopping off at the pit stop to refuel along the way.


Pack it away by folding over the car pockets (this stops the cars from falling out in transit) and then folding the whole mat over twice and tucking away in a bag to carry out with you.


Check it out in my etsy store.

Wednesday, June 22, 2016

Sewing Tutorial Quiet Book Pages - Rainbow, Butterfly, Hot Air Balloon

A few months ago a custom order came through my Etsy store. One of my most popular existing items is the Quiet Book that I sell through the store and one of the great things about it is that it is so easy to add extra pages to it as I join the pages together with ring binders.

The request was to add in one extra page (two-sided, so two extra designs) more suited to a smaller child. See the finished product below!


To make the rainbow, I cut the red (largest) semicircle first and then cut each next colour a little smaller. I then sewed the red semicircle onto the page and followed with each smaller one until I was done.

I overlapped two little light grey clouds over the bottom edge and cut out two identical pieces in a small butterfly shape. I sewed these together, inserting antennae and leaving a small opening on each side so that I could feed through the thin ribbon. When constructing the page and joining it to the previous one, I fastened in the ribbon between the pages. 

The cute little butterfly can be pulled along the ribbon to fly around in front of the clouds.


For the hot air balloon, I first sewed the blue felt rectangle onto the background page as the sky. Then I added two little white clouds and sewed on the main hot air balloon shape (here in the white with coloured spots). I attached four short lengths of ribbon to the base of the balloon cover (here in orange), and then sewed this felt piece at the top of the balloon. I attached the ends of each ribbon at the bottom and then hid the ends by sewing the balloon basket over them.


The doll is used in another page (the tent and sleeping bag page) in the book, so rather than add another, and in order to make it easier to handle for a small child, I attached a ribbon to the doll so that it could be used for both pages, and also couldn't be easily lost - double win!


Sunday, December 27, 2015

Baby Doll Swaddle - Pattern and Tutorial - Easy DIY


You will need:

  • Approx 0.5 metres/ yards of a print fabric for the main fabric.
  • Approx 0.5 metres/ yards of a plain lining fabric for the inside of the swaddle. 
  • Approx 0.5 metres/ yards of a light wadding, such as Pellon fleece.
  • Velcro
  • Small scraps of felt for heart decorations.
  1. Start by printing the three pages of the pattern and cutting out the pattern pieces along the solid line. The pattern pieces for the main part of the swaddle will need to be joined together along the dotted line, by matching and then taping the two pieces together.
  2. Place pattern pieces with the marked straight edge along the folded edge of the fabric and cut out one piece in each of the two fabrics (main and lining), as well as the wadding.
  3. Depending on the wadding used (and following the directions for the wadding type), iron the main fabric over the wadding piece to secure.
  4. Begin by sewing the darts into the separate fabrics. Fold over the fabrics along the centre line of each dart and sew along the outer line to create shape in the foot pocket and top part of the swaddle.
  5. Then take the two pieces of lining fabric, right sides together, and sew together around the round bottom edge. Repeat for the outer fabric. Snip along the curved seams and turn one of the fabrics out the right way.
  6. Place this piece inside the other, so that right sides are together. Now join the two fabric cases together by starting in the middle of the top seam and sewing around all of the edges, leaving a space of about 4cm (1.5in.) as you return to where you started.
  7. Trim all corners and curved edges and turn the swaddle out the right way. Iron the seams flat, especially where the opening is at the top seam.
  8. Top stitch around all edges, closing up the opening at the top seam.

9. Pin a strip of velcro to the position indicated on the pattern for the foot pocket. Sew this down and sew the matching velcro to the flap that you prefer to fold down first (on the inside). Then sew two small pieces of velcro onto this same flap, but on the upper side and the matching velcro to the underside of the flap that will fold down last (see picture above for velcro placement).

10. Finally, attach your felt shape (be imaginative to match your fabric, or to suit your child's preferences here!) to the top flap.


Tuesday, September 15, 2015

Sewing tutorial: Kids dress up ideas - firefighter

This is all you will need to make your own firefighter dress up costume:

  • a long sleeved red shirt (I bought mine from a thrift store)
  • felt - bright yellow and grey/silver
  • thread, pins etc.
The first step is to cut strips of felt. The strips of yellow felt should be approx 8cm/3in and the grey will need to be about 2.5cm/1in.


Pin the grey felt to the centre of the yellow felt and sew along both edges of grey felt, in a few millimetres.

Then pin your strips in place on the shirt - the top strips will be placed level with the arm pit of the shirt and then the next strips down about halfway. Sew along both edges a few millimetres into the yellow felt.


Simple, but very effective!

Friday, May 29, 2015

Sewing Tutorial - Hungry Caterpillar Felt Set

This has always been one of our favourite books in our house. Our children are being brought up bilingual (my husband is German) and it's one of the few books that we have in both English and German.

From a teacher's point of view, I love the book because it teaches kids the days of the week, number sense and counting, the process of a caterpillar becoming a butterfly and, for our younger child, we even talk about colours when we read because the pictures are so bright and beautiful and those fruit pages are perfect for it.

Now, our eldest is 4.5 years old and very interested in learning about how to put a story together and how to read. And that is where the idea for the felt set has come from.


I started out by going through the book and choosing the main parts of story and the most important pictures. I then sketched these. I made each item double layered and added any trim on top of this. It makes them stronger (to last longer) and not as floppy (for more effective play).


I then cut out fabric for a case in which to keep the set together. You could make any size that you prefer, this just fit the zippers I had available at the time. I used clear vinyl PVC for the front of the case and a cute hungry caterpillar quilting cotton that I bought some time back. To keep the seams neat through the PVC, I cut a double layer of cotton, put right sides together and sewed around the rectangle, leaving a gap to turn to out the right way (so that front and back are showing the fabric design on the right side, and all seams are hidden inside). After turning it out the right way, I attached the zipper to the front and back as in the above right picture.


With right sides of the front and back together, I sewed around the edges, opened up the zipper and turned the case out the right way to finish with the above case. 


But back to the felt set....I placed all layers as I wanted them when finished and sewed around each edge, a few millimetres in from the edges. 


Saturday, May 23, 2015

Sewing tutorial and pattern - Balloon cover

These covers were one of those things that I had seen around and thought was such a great idea. "One day I'll make some of those...". When I finally got around to experimenting and going through with it last week I couldn't believe I had put it off that long! So easy and fast. And they have been the number one toy here with both Mr 2.5 and Miss 4.5 since I finished them. We love balloon covers!

You will need two contrasting fabrics and the pattern (available here).

Cut six of the curved strips on the fold, and three of the hexagons on the fold.


And now start sewing. Choose one of each fabric and place them right sides together. Sew down one side only. Now take a new piece and place it right sides together with the contrast fabric. Sew down the next side. Take another new piece and place it right sides together with the contrast fabric. Sew down the next side. Repeat, repeat, repeat until there are no curved strips left. Place the two open sides right sides together and sew down to join.


Prepare the ends for sewing. Place two of the hexagons with right sides together. Pin a line through the centre across the hexagon. Sew from the outer edge inwards, leave a gap (approx 4cm) and then sew through to the other outer edge.

Fold down the pieces so that you now have wrong sides together and right sides showing.

Top stitch a few millimetres from the centre line on both sides to secure and to reinforce the slit that has now been formed in the middle of the piece.

Pin the hexagons into the ends of the ball, right sides together and sew along to enclose the ball.


Poke a deflated balloon through the opening at the end, keeping enough on the outside to blow the balloon up. Blow up the balloon, tie off the end and tuck it in.


Sewing tutorial and pattern: Mermaid dress up tail for kids

We love dress ups at our house. Little by little I've been adding to the kids' collection of costumes for play.

I wanted to make Miss 4.5 a mermaid tail that would grow with her and not be too tight at the ankles that she wouldn't be able to walk or play in it. 

You can download and print the pattern for the fin here.

First, choose your main fabric. I wanted something shiny, so I went for this sequined fabric. You'll need a rectangle - it should reach from your child's waist to the floor (length) and wrap around their body with a 15cm overlap (width). You can allow a little extra for hemming. Hem around the rectangle - I rolled approx 0.5cm over, then rolled over again and sewed along.


Cut two mermaid fins on the fold. Optional is to also cut iron on interfacing to iron onto one of the fin pieces to make the fin a little firmer.


Place right sides together and starting at the top right, sew around the edges, finishing at the top left. The fin can be sewn to the skirt along the bottom.

For fastening the waist, sew velcro along the waistline.


I trimmed the edging of the fin with some of the left over sequin fabric, but it is totally optional.

Sewing Tutorial: Putting together your Quiet Book pages to make a book

You've spent hours cutting out little felt shapes, positioning them on pages, sewing, stitching on faces and finishing touches and now you have the pages all made for your Quiet Book. Well done! It's no easy task. No doubt plenty of patience, glasses of wine and cups of tea have passed between you and your Quiet Book pages. So let's take a look at one way to put it all together and make a book out of what you've got in front of you.


Work out the order of your pages and then pair them up in front to back pairs. Put them right sides together. Sew around with approximately 1cm/0.5 inch seam, leaving a gap wide enough for turning out the right way. Trim the corners as in the picture below.


Turn out the right way and push the corners out to neaten. It should look something like this:


Then sew a top-stitch a few millimetres from the edge to neaten it off and close off the opening.

Covers can be made in the same way (you'll need front and back covers):

  • right sides together
  • sew around, leaving an opening
  • trim corners
  • turn out the right way
  • topstitch edges
I like to add a button tab to my cover. The length and width depend on the thickness and size of your book. Cut two rectangles, allowing a 0.5cm/0.25 inch seam and follow the same steps as above.


Of course there are loads of options for putting your pages together, but my favourite way is to use binder rings. I then sew two buttonholes on each page where I want to place them. Easy! Especially if your sewing machine does automatic buttonholes as mine does :-)


Monday, May 18, 2015

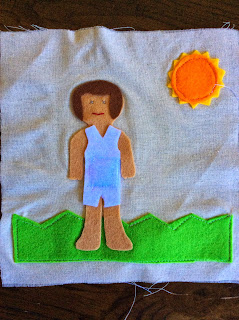
Sewing tutorial: Quiet Book pages - Clothesline and dress up doll


When I first made this page for my daughter's Quiet Book almost three years ago, I decided to combine a clothesline with dressing dolls. It is a great idea for a velcro page and she has really loved playing with and dressing up the doll.


The clothesline page is made up of felt, ribbon and velcro. The first step is to sew down the velcro and ribbon strips. Cover these with the brown felt strips and sew around the edges to fasten in the sides of the ribbons and velcro and to hold down the clothes line poles. The last step is to sew the grass down over the top.


The doll page is made up of felt, velcro and some embroidery. The grass should go down first. Then attach the body felt. I like to use an adhesive backing (Heat n Bond Lite), made for applique. To use this, trace an outline of the body, iron it onto the felt, cut out the shape around the outline, and then iron it down on the background fabric. The doll will need some hair and I like to give it some underwear. Then attach a sun in the sky. Embroider on eyes and a mouth, or you could use markers to draw them on.

I then sew a square of velcro on the tummy so that the clothing will attach.

I find it a good idea to sew around the edges of the shapes to secure them down so that they withstand repeated pulling when your children are pulling off the clothing.


The clothing can be as plain or as decorative as you choose. I like to keep mine fairly plain. The adhesive applique paper can be helpful again for drawing out the outline of each piece of clothing. Use the body as a guide as you want to cover all of the body and fit the arms and legs. Draw the clothing outlines onto the paper and iron on a neutral colour felt which will serve as backing. Sew on velcro and then iron on the clothing coloured felt. Again, sewing around the edges will make the items last long and withstand all that velcro action.


Saturday, March 7, 2015

Sewing Tutorial: Quiet Book Page - Tent and Sleeping Bag (zippers)


The idea for this page came from Still:Living, but has been modified over time by me.

I usually use a cotton drill or poly cotton for the blue sky backing and felt for the remainder of the page.

STEP ONE

You will need to draw on your transfer paper:
  • a rectangle for the background (leaving about three cm around all sides for stitching and borders), to be ironed onto blue cotton fabric. 
  • a crescent moon to be ironed onto white felt. 
  • outline for the doll, to be ironed onto a skin coloured felt. 
  • outline for dolls clothing - shorts, shirt to be ironed onto chosen felt colours. 
  • outline for dolls hair to be ironed onto chosen felt colour. 
Iron these pieces onto the corresponding fabrics and and cut out.


STEP TWO

Peel off the paper layers. Iron on the background piece to the page fabric. Then iron on the moon shape in the top left corner. 

Iron the body felt piece onto a neutral background piece of felt and then iron on the shirt, shorts and hair.

  
STEP THREE

As you will not be ironing them on, but only sewing, you will also need a triangle for the tent, cut through the centre and a rectangle for the sleeping bag, also cut through the centre.

Sew these either side of a zipper, making sure that the bottom edge is against the bottom edge (where the zipper closes) of the zipper.

Trim the zipper along the edge of the felt and sew several times over near the top, cut off end of the zipper. 


STEP FOUR

Check that the sleeping bag fits under the tent and if not, trim sleeping bag down.

Sew the sleeping bag onto the background. Then sew the tent over the top. Sew a zigzag stitch around the edges of the background.

STEP FIVE

Cut out the doll and sew around the edges to fasten the felt layers together. Sew on eyes and a mouth.


FINISHED! Put your doll to bed in her/ his tent :-)


Friday, February 27, 2015

Sewing Tutorial: Preparing to make your first Quiet Book

For my first Quiet Book was to make my daughter a special toy that would keep her occupied on the long flights from Brisbane, Australia to Frankfurt, Germany. In the end we didn't end up taking it with us, as it contained too many pages, too many small pieces and was a little overwhelming for her when she was little Miss 19 months old.


It was beautifully made with lots of love and we play with a lot now, but my biggest advice would be to keep it simple. I couldn't narrow down the pages I wanted to include, so I just kept adding page after page to the plan until it became 14 pages of activities. Stick to 6 or 8 activity pages all up. It will be enough.


Since that time, I've made dozens of them to sell and I've perfected and simplified my method. I plan to share this method with you step by step here, starting in this blog post with the first stage - the planning and preparations.


1. DECIDE ON FABRICS

I make all of my quiet books from calico cotton, cotton print and felt. I find that the calico is heavy enough to last, and felt is easy to work with because it doesn't require edging. I use a cotton print fabric for the covers.

I like to join my pages together with binder rings. It means sewing just two buttonholes in each page, looks neat, and allows you to add and exchange pages when you want to.

2. PLAN OUT A THEME, DECIDE ON ACTIVITIES

My most popular quiet book is an unthemed one, but I have also designed and made counting quiet books, alphabet ones, colour books, and shape quiet books.

I like to vary the activities on each page and have included: size matching, colour matching, counting, tying shoes or bows, buckles, zips, magnet fishing, velcro, studs, buttons, finger puppets and more.

My suggestion is to get on Pinterest and explore ideas until you have picked your top 10, then narrow it down some more.

3. BUY YOUR MATERIALS

The costs can add up quickly. Check out dollar stores for things like zippers, buttons, felt packs and other supplies. EBay is one of my favourite places to shop for buckles, buttons, velcro, magnets, snaps, ribbons and beads. Buying bulk packs of calico can also help you save.

4. CUTTING OUT

First, decide on size. I used to make my books quite large, but slowly they've become smaller. My ideal size is 18cm by 20cm.


You will need to allow for seams. I like to allow 1cm on each side, so for a finished size of 18cm by 20cm, I would need to cut out a piece 20cm by 22cm. If I am making six activity pages, I would cut out eight of these to allow for two extra, one for inside the front cover and one for inside the back cover.

Then you will cut out another two pieces of the same size for the outside of the front and back covers. Choose a vibrant cotton print fabric for these.


I sometimes choose to line each piece of fabric with a light iron on interfacing. This will depend on the weight of the fabrics that you are working with. If they are quite light, the interfacing will make it easier to sew on the felt pieces later. If the fabrics are heavier, you may be able to skip this step. If you decide to use interfacing, cut it out the same size as your ideal finished book size (in my case this would be 18cm by 20cm) and iron it on close to the centre of each fabric piece before going any further.

5. MAKING THE FELT PIECES

I've tried a few different ways to do this, but I always come back to using Heat n Bond Lite Iron on applique paper, or a similar product.

You can draw your design directly onto the paper, iron it onto the felt, cut it out, peel off the paper to leave the adhesive backing and then iron the felt piece onto your calico fabric. Once you have ironed the felt pieces onto your main fabric it is a good idea to sew around each piece to ensure it stays attached to the fabric. The adhesive applique paper can lose some of its effectiveness after a while.

In my next blog post, I'll be sharing a pattern for a colour matching page featuring a monkey holding four balloons. I'll also explain the full process for putting together the page.

Stay tuned!


Thursday, February 19, 2015

Sewing tutorial: Cuddly little koala softie toy!


Back in 2007 I spent six amazing months in Peru. I travelled, taught, learned Spanish, volunteered and learned how to weave. I made some really good friends too.

One of those friends is starting a project to improve the lives of some of the kids who live in local orphanages. I really wanted to help, but living so far away I was not sure what I could do.

I thought I would put together a package of handmade toys (including some of these koalas) and clothes and make some learning materials for the kids. Then I wondered if there would be something more long term that I could do to help. So I'll be selling some of these koala softies in my Etsy shop and sending on the money made from their sale to my friend's project. So if you can, buy a few for the kids you know and help other children at the same time!

KOALA SOFTIE

1. Print out the pattern. Cut out two koala shapes from grey felt. You will also need:
  • two ears and a belly from a contrast colour
  • one nose and two eye pupils from black felt
  • two white eyes from white felt
  • thread for sewing together and embroidery thread for sewing the mouth


2. Attach the ears, eyes, nose and belly to the koala front. 


You could glue these on, sew by hand or machine sew them. I machine sewed because of the quantity that I plan to make, but it is completely a personal preference.

3. Embroider on a mouth where it indicates on the pattern and then attach the back by sewing close to the edges. Leave a small opening between the legs, stuff the koala with polyfill or fabric scraps and then close up.


Cute and cuddly!


Sunday, November 3, 2013

Works in progress: Richie's new doll, birthday bunting, dinosaur shirt, clothes for me at last!

Meet Richie's new doll:

My baby boy is about to turn one, so I've made this gorgeous little doll to add to his birthday presents. The pattern came from: http://www.makeit-loveit.com/2013/02/girl-boy-fabric-dolls-pattern-pieces-included.html, where there are also pattern for some girl dolls and clothing. I'm sure I'll be making one of those for his big sister soon :)

The more pressing birthday though is Miss Almost 3 tomorrow. Eeek. We've decided on a joint birthday party as the two children have their birthdays about a month apart. So tomorrow there'll be balloons, presents and a simple birthday cake at home with just the four of us. And this pretty bunting which we can reuse for the party in two weeks:


I found the free pattern and tutorial for this little shirt online last week: http://www.smalldreamfactory.blogspot.com.au/2011/07/free-pattern-short-sleeve-shirt-size-12.htm, which I've just cut out (beware the pattern does not include seam allowance - I found this out the hard way of course... must read instructions before cutting into my fabric!). I'm making one for Mr Almost 1 for the birthday party out of the dinosaur fabric below (top left):


I picked up all these fabrics for 40% off at a sale a week ago - some great finds there! It was so hard to limit them as I didn't want to spend too much money all at once. Already I've started cutting into most of them :-) The blue green one on the top right will become a top for me and the navy/orange fabric with cherries will become a simple dress for me. Not sure yet what to make out of the underwater fabric, or the bugs....