Showing posts with label quiet. Show all posts

Friday, July 31, 2015

Sewing tutorial - Colour your own art supply bag

Ikea. I love the stuff that they sell, but I'm not a fan of the shopping experience. Finding a parking spot, finding what you want in the store and then getting out before two young children lose it. This time we went in with a plan. Fabrics only. Straight there and straight back out. I didn't believe it could be done, but that is how it went. And they even had a little play area at the fabric section! Wow!

So I bought a few metres of the Tidny fabric and we love it. The kids spent part of a lazy Sunday afternoon colouring in and then I made it up into art supply bags. The bags now travel with us when we eat out, filled with some Frozen colouring in pages, coloured paper, markers and stickers. A success!

I washed the fabric and cut a wide strip out (allowing for handles and pockets too) and then the kids used fabric markers to colour in the designs on the fabric. Later I placed baking paper over the fabric and ironed over, applying heat to fix the colours.


I cut a lining for the bag, pockets and handles, and a second fabric for some of the inner pockets.


For the handles, place right sides together and sew along one short end and the long side. Turn it out the right way. Top stitch along the two long ends.

For the top pocket, place right sides together and sew along the two long edges. Turn out the right way and press. Top stitch along the top long edge.

For the two bottom pockets, place right sides together and sew along the top long edge. Open out, press and top stitch along that long edge.

Take the top pocket and pin it in place on the lining fabric. Sew a few mm above the lower seam to fasten the piece to the lining. Sew vertically to form smaller pockets.

Sew velcro strips to the lining and the lower upper pocket. Use a tacking stitch close to the edge to put the lower pockets and handles in place. Now sew the bag outer and lining together by place right sides together and sewing around the outside with all pockets and handles in place between. Be sure to leave an opening to turn it out the right way.

Turn the bag out the right way and press. Sew a top stitch around all outer edges to finish off. Fill with goodies and enjoy!


Saturday, May 23, 2015

Sewing Tutorial: Putting together your Quiet Book pages to make a book

You've spent hours cutting out little felt shapes, positioning them on pages, sewing, stitching on faces and finishing touches and now you have the pages all made for your Quiet Book. Well done! It's no easy task. No doubt plenty of patience, glasses of wine and cups of tea have passed between you and your Quiet Book pages. So let's take a look at one way to put it all together and make a book out of what you've got in front of you.


Work out the order of your pages and then pair them up in front to back pairs. Put them right sides together. Sew around with approximately 1cm/0.5 inch seam, leaving a gap wide enough for turning out the right way. Trim the corners as in the picture below.


Turn out the right way and push the corners out to neaten. It should look something like this:


Then sew a top-stitch a few millimetres from the edge to neaten it off and close off the opening.

Covers can be made in the same way (you'll need front and back covers):

  • right sides together
  • sew around, leaving an opening
  • trim corners
  • turn out the right way
  • topstitch edges
I like to add a button tab to my cover. The length and width depend on the thickness and size of your book. Cut two rectangles, allowing a 0.5cm/0.25 inch seam and follow the same steps as above.


Of course there are loads of options for putting your pages together, but my favourite way is to use binder rings. I then sew two buttonholes on each page where I want to place them. Easy! Especially if your sewing machine does automatic buttonholes as mine does :-)


Monday, May 18, 2015

Sewing tutorial: Quiet Book pages - Clothesline and dress up doll


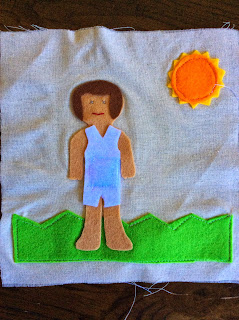
When I first made this page for my daughter's Quiet Book almost three years ago, I decided to combine a clothesline with dressing dolls. It is a great idea for a velcro page and she has really loved playing with and dressing up the doll.


The clothesline page is made up of felt, ribbon and velcro. The first step is to sew down the velcro and ribbon strips. Cover these with the brown felt strips and sew around the edges to fasten in the sides of the ribbons and velcro and to hold down the clothes line poles. The last step is to sew the grass down over the top.


The doll page is made up of felt, velcro and some embroidery. The grass should go down first. Then attach the body felt. I like to use an adhesive backing (Heat n Bond Lite), made for applique. To use this, trace an outline of the body, iron it onto the felt, cut out the shape around the outline, and then iron it down on the background fabric. The doll will need some hair and I like to give it some underwear. Then attach a sun in the sky. Embroider on eyes and a mouth, or you could use markers to draw them on.

I then sew a square of velcro on the tummy so that the clothing will attach.

I find it a good idea to sew around the edges of the shapes to secure them down so that they withstand repeated pulling when your children are pulling off the clothing.


The clothing can be as plain or as decorative as you choose. I like to keep mine fairly plain. The adhesive applique paper can be helpful again for drawing out the outline of each piece of clothing. Use the body as a guide as you want to cover all of the body and fit the arms and legs. Draw the clothing outlines onto the paper and iron on a neutral colour felt which will serve as backing. Sew on velcro and then iron on the clothing coloured felt. Again, sewing around the edges will make the items last long and withstand all that velcro action.


Sunday, March 22, 2015

Sewing Tutorial: Quiet Book page - Old McDonald had a barn and some finger puppets

The barn page is page three of my Quiet Book. I adapted the idea from the template on Homemade By Jill (http://homemadebyjill.blogspot.com.au/2009/07/quiet-book-templates.html).

STEP ONE
You will need red, white and brown felt. Draw each shape on the transfer paper - red barn, brown window, white stripes and two brown rectangles the size of the barn doors. Iron the paper onto the felt and cut out the shapes. Cut between the doors and fold them back. Iron on the brown rectangles to the back of the doors. Peel off the rest of the paper, leaving the adhesive on the back of the shapes. Iron shapes onto the page fabric, starting with the red barn, then the brown window and finally the white stripes.


STEP TWO
Cut out the finger puppet shapes. Fasten on the noses and cow spots. Embroider some eyes on all and nostrils on the pigs. I usually fasten down each piece by sewing a top stitch so that it doesn't fall off. Sew the ears, horns etc onto the back piece of each finger puppet and then sew the fronts and backs together.


STEP THREE
Sew top stitch around each piece of the barn and white edging to be sure it does not come off. Cut another piece of brown felt to fit inside the doors and hold the finger puppets in place.Sew it down on the sides and bottom.


Done!

Put it aside and get ready to prepare the next pages!


Friday, February 27, 2015

Sewing Tutorial: Preparing to make your first Quiet Book

For my first Quiet Book was to make my daughter a special toy that would keep her occupied on the long flights from Brisbane, Australia to Frankfurt, Germany. In the end we didn't end up taking it with us, as it contained too many pages, too many small pieces and was a little overwhelming for her when she was little Miss 19 months old.


It was beautifully made with lots of love and we play with a lot now, but my biggest advice would be to keep it simple. I couldn't narrow down the pages I wanted to include, so I just kept adding page after page to the plan until it became 14 pages of activities. Stick to 6 or 8 activity pages all up. It will be enough.


Since that time, I've made dozens of them to sell and I've perfected and simplified my method. I plan to share this method with you step by step here, starting in this blog post with the first stage - the planning and preparations.


1. DECIDE ON FABRICS

I make all of my quiet books from calico cotton, cotton print and felt. I find that the calico is heavy enough to last, and felt is easy to work with because it doesn't require edging. I use a cotton print fabric for the covers.

I like to join my pages together with binder rings. It means sewing just two buttonholes in each page, looks neat, and allows you to add and exchange pages when you want to.

2. PLAN OUT A THEME, DECIDE ON ACTIVITIES

My most popular quiet book is an unthemed one, but I have also designed and made counting quiet books, alphabet ones, colour books, and shape quiet books.

I like to vary the activities on each page and have included: size matching, colour matching, counting, tying shoes or bows, buckles, zips, magnet fishing, velcro, studs, buttons, finger puppets and more.

My suggestion is to get on Pinterest and explore ideas until you have picked your top 10, then narrow it down some more.

3. BUY YOUR MATERIALS

The costs can add up quickly. Check out dollar stores for things like zippers, buttons, felt packs and other supplies. EBay is one of my favourite places to shop for buckles, buttons, velcro, magnets, snaps, ribbons and beads. Buying bulk packs of calico can also help you save.

4. CUTTING OUT

First, decide on size. I used to make my books quite large, but slowly they've become smaller. My ideal size is 18cm by 20cm.


You will need to allow for seams. I like to allow 1cm on each side, so for a finished size of 18cm by 20cm, I would need to cut out a piece 20cm by 22cm. If I am making six activity pages, I would cut out eight of these to allow for two extra, one for inside the front cover and one for inside the back cover.

Then you will cut out another two pieces of the same size for the outside of the front and back covers. Choose a vibrant cotton print fabric for these.


I sometimes choose to line each piece of fabric with a light iron on interfacing. This will depend on the weight of the fabrics that you are working with. If they are quite light, the interfacing will make it easier to sew on the felt pieces later. If the fabrics are heavier, you may be able to skip this step. If you decide to use interfacing, cut it out the same size as your ideal finished book size (in my case this would be 18cm by 20cm) and iron it on close to the centre of each fabric piece before going any further.

5. MAKING THE FELT PIECES

I've tried a few different ways to do this, but I always come back to using Heat n Bond Lite Iron on applique paper, or a similar product.

You can draw your design directly onto the paper, iron it onto the felt, cut it out, peel off the paper to leave the adhesive backing and then iron the felt piece onto your calico fabric. Once you have ironed the felt pieces onto your main fabric it is a good idea to sew around each piece to ensure it stays attached to the fabric. The adhesive applique paper can lose some of its effectiveness after a while.

In my next blog post, I'll be sharing a pattern for a colour matching page featuring a monkey holding four balloons. I'll also explain the full process for putting together the page.

Stay tuned!