Thursday, November 8, 2012

Maternity leave projects


This time around I made it to maternity leave (yay!) and so I thought it would be nice to complete a few sewing projects. There's probably going to be little time for sewing for a while after No. 2 arrives.

I found this simple little pattern online for a reversible baby hat and made two, because I thought the monkey/helicopter design might be a bit loud for a young baby. On finishing the two though, I think it's the one that I prefer.

Sadly I can't find the website again to refer to it here, and it was in Dutch anyway. With lots of help from google translate, I worked out the main parts.


 I finished this bag this morning. I've been trying to decide on a new bag to make, one that's a bit summery. Now that it's finished I'm not sure if the colours are that great for summer, but it's cute all the same and good practical size for carting around those toy animals, snacks, drink bottles etc. I got the pattern from this blog: http://machenmachen.wordpress.com/2007/08/31/free-pattern-for-the-wasp-bag/. and I have to say that the adding the buttons completely lifted the look of the bag. I was actually a bit disappointed in it when I was done with the main sewing last night, but now that the buttons are on, I love it.


 Now to the felt food... Mia was given a play kitchen a little while ago and although being quite young, she was happy for a while to use anything to put into and out of the cupboards, I thought some felt food might be a nice addition. She had some plastic fruit and vegies, but these just look so much better. I found some great pictures online, but made most of the patterns myself through trial and error - there's also a steak to go with the broccoli and potatoes (the orange thing is fish, not an over-sized carrot!)


I'm also part of the way through adding to my backpack collection - just waiting on some supplies to arrive to finish them. And I thought I'd make myself a few new dresses for after this baby comes, but being disappointed in the choice of fabric in the stores around here (and the price), I'm waiting on some fabric to arrive by mail for those.

Wednesday, September 12, 2012

Spring is near

Continuing on with trying to be crafty with Mia, we tried out threading with the coloured pasta. Although difficult still, Mia loved sitting together and threading. Then she just went mad for pouring and putting coloured pasta all over the place. She loved it and could have played for hours like this.


Then we made a sheep. Mia's a huge fan of sticking - I think her childcare centre has been teaching them about sticky stuff recently. We kept to using clear contact because it's just so easy and I can sit back and watch her create without worrying that she's going to eat any glue.
And then a Father's Day present. I'd seen this idea months ago on Pinterest and thought it was very cute. So we made some homemade paints again with water, cornflour and food colouring. I thought I'd try this recipe and see if it lasted longer than the last time we made paints - the last recipe had a lot of sugar in it too - but it lasted much the same time. Actually I think I prefer the paint with sugar in it, because some of this crumbled and fell off when it was dry.


Finally I finished the smaller version of the quiet book - these ones have been made as gifts and for sale. The hours and hours of work that goes into one of these babies can never be set at a price that anyone's willing to pay, so I tried to keep it simple and limited myself to 6 activity pages - the best six. These have been Mia's favourites so far in her book.


Quiet book cover
Monkey with snap fasteners


Tie the shoe
Barn and animal finger puppets


Count the beads
Tent, sleeping bag and doll with zippers
       
Mr Potato head with velcro
Pocket for all the pieces, plus some pieces for a Mrs Potato Head 
     

And some sewing for our baby who's now only 10 weeks away - a hanging wall storage and some wall art for above the cot.

I quilted the back section of the wall hanging and then made the pockets with square corners, lined with a very stiff interfacing. I'm still not sure if the pockets will sag after a while, especially if they're not stuffed full at the bottoms and have heavy stuff in them.
I found the idea for this one thanks to Martha Stewart, although the original idea was three larger frames. I bought a cheap white frame and a bunch of scrapbooking card stock and chose my book: Dr Seuss' Oh the Places You'll Go! The finished product looked quite effective - I especially like the black section with white writing and the orange giraffe. It stands out a lot more than the other two sections.


I made this one a while back, but never photographed it until now. I had made one as a birthday gift for a friend's baby, and had a second shirt so I thought I'd make one for Mia also. It turned out really cute and is an easy way to brighten up a plain t-shirt. I used heat and bond paper to attach the circles to the t-shirt fabric and then just sewed a tight zig zag stitch around each one to secure it on.

Sunday, August 12, 2012

July and August

I recently looked back over my posts and found that a year ago, I'd finally started again on the blanket I had started making for Mia when I was pregnant with her. Going through a knitting phase back then, I had started knitting a multicolour striped blanket, but of course ran out of time (I couldn't stay awake long enough in the evening during pregnancy to get anything done on it). For this baby, I decided I wanted to make something that would be finished before the birth, so I found some ideas for a baby quilt online (I'm now addicted to Pinterest - it's awesome for finding craft ideas). Late in July we found out that our November baby is going to be a boy, so I chose some fabrics from my leftovers pile and powered through making this simple quilt (http://befickle.blogspot.com.au/2011/04/you-can-make-quilti-have-proof.html). It's not huge, but it's the perfect size to fold up and take with you to put on the floor at a friend's house for bub to lie on, or to keep baby warm in the pram.

Another find that I was keen to try out when I found out we were having a boy were these pants (http://www.made-by-rae.com/2010/10/free-raes-basic-newborn-pant-sewing-pattern/). Super easy, but so cute. There are some great free patterns at this site - my sister made the little premmie dress for Mia after she was born 4 weeks early and very small. It was so cute.

And I made a couple more backpacks. This time to add to my Etsy store which was looking a bit empty. I'm still working on a couple of quiet books to add too.


Recently, I've also been putting together a craft box for Mia with lots of different supplies. In the process of trying to work out what to include I've found some really great ideas, like the coloured pasta for threading and using contact (clear adhesive) as an alternative to glue. I had searched everywhere to find beads large enough and with big enough holes for Mia to use for threading and all I could find were really expensive ones from educational supply shops. It should have been obvious, but I didn't even think of using pasta. A much cheaper alternative and we had a fun craft lesson just doing the colouring.

Sunday, June 10, 2012

Babies, babies, babies...


All of my latest creations have centred around babies gifts and accessories. Not only are we due to have our second child in late November, but between now and the end of the year so many friends of ours will also be welcoming new additions to their families.

I spotted these bunnies on http://chezbeeperbebe.blogspot.com.au/2010/03/tutorial-and-pattern-recycled-mooshy.html and picked up some cute striped long-sleeve tops that I thought would be perfect to cut up and  use to create them. They turned out pretty cute.

See for tutorial: http://chezbeeperbebe.blogspot.com.au/2010/02/tutorial-and-pattern-rainbow-sunshine.html 

After I finished the bunnies I went exploring around on the above blog and found the idea for these little soft plushies. So easy and fast to make, but so gorgeous. I love the idea of the rainbow coloured ribbons and had all of these in my craft supplies from my hair clip making phase, when I ordered a whole lot of bargain ribbons in bulk online.


When I was pregnant with Mia I didn't think one of these pillows would be all that useful and after she was born I saw some around but couldn't believe how expensive they were. This time around I figured I'd be prepared early when I still have some time for sewing and make myself one. Propping my arm up on pillows and sofa arms for another year and a half is not an attractive thought when they are so easy to make. There are patterns everywhere online for these pillows and I had some scrap fabric and picked up a couple of massive cushions on sale to use for the stuffing as I thought that since the stuffing is already compressed a lot, they wouldn't squash down as much as regular filling when the pillow gets some use. I bought far too much of this pretty fabric when it was on a 40% off sale a while back and thought it might be a cute theme to go with for baby accessories this time around. If you can't see clearly from the picture, it's the three little pigs.


The idea came from: http://sewshesews.wordpress.com/2010/03/22/for-the-love-of-polka-dots-a-crib-mobile-tutorial/ 


These mobiles were another gift idea and are simple to make but really effective. Lots of circles of fabric, ribbon and iron-on adhesive.... and patience!

And just so that Mia didn't miss out completely in my latest crafting craze, I made her a doll carrier as she's really into her dolls at the moment.

Wednesday, April 25, 2012

Finished!

I actually finished it a few months ago, but it's taken me a while to get around to posting these pictures of the completed book. It was a great feeling to finally put the book together!
Page 1- matching with velcro and magnetic snaps
Because of all the pieces that are just held on by velcro, I thought it best to enclose everything with a zipper. The cover is also interfaced with a light interfacing, and lined with a plain calico fabric. I sewed on loops on the inside to hold the rings. I wanted to use rings so that it would be easy to take pages out and add new ones later.
Pages 2 and 3 - matching with snap fasters, tying a bow
Pages 4 and 5 - fasteners and finger puppets
To put the pages together, I ironed about a centimetre over on each edge and pinned each page back to back with another, then top stitched around the edges. As I had already interfaced each page with a light-medium interfacing, this worked well. For the binder rings, I sewed two small button holes on each page.


Pages 6 and 7 - dress the dolls - velcro

Pages 8 and 9 - fishing with magnets, tent and sleeping bag with zippers

Pages 10 and 11 - matching/using buttons, a page for Mia's car

Pages 12 and 13 - bead counting and potato head

Page 14 - Potatohead pocket
I still find it hard to believe how many hours and how many materials went into making this book. We're saving the book now so that it's a new toy when we fly to Germany in less than two months time.

Thursday, February 9, 2012

The Quiet Book

In June we're going to Germany so that Mia can meet her family on her daddy's side. Two adults and a 19-month old on a plane full of people for a total of 20 plus hours. Not really anyone's idea of a holiday, but I'm hoping that preparation is the key. I did some reading about how to keep a toddler occupied while travelling and found some great ideas about activity bags and quiet books. Although most ideas in quiet books are aimed at children who are slightly older, I thought I'd give one a go in the hope that she (and us, and the rest of the passengers on the plane) might get some benefit out of it. 

Planning the quiet book was loads of fun. As was drawing the designs and playing with a pile of coloured felt. I decided on 12 activities in the end and bought a few metres of calico, some light fusible interfacing, felt in a bunch of colours, and some fusible webbing used for applique. 

I cut out rectangles of calico in the size I wanted (27cm by 31cm) and backed each piece with interfacing slightly smaller so that the seams won't be too bulky when I put together the pages. I wanted to interface each page to make the pages sturdier, especially when sewing the felt pieces on.


Then I worked page by page, drawing the designs in reverse on the iron on applique webbing. This has also helped to make things a lot sturdier, and the finished product a lot neater. As I don't want to risk any of the felt pieces falling off, I've sewed around each, but the applique webbing just gives it a nicer finish.

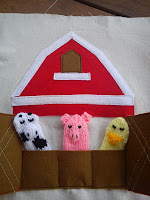
Once I'd collected all the materials for the pages and done some ironing on, I tackled the barn page. I got inspiration and a pattern from  http://servingpinklemonade.blogspot.com.au/2011/01/quiet-book.html  and used red, white and brown felt, ironing on each piece and then reinforcing by sewing around them. I'd knitted the finger puppets ages ago and never done anything with them and figured they were perfect for the barn. 

Next I made the potato heads. I took some ideas from http://www.oopseydaisyblog.com/2010/05/mr-potato-head.html. Shown here is Mrs Potato Head, and I also made accessories for Mr which fit to the same potato. All of the removable pieces are double sided to make them more durable


The fishing page was fun... I took ideas from  http://shannonmakesstuff.blogspot.com.au/2010/07/quiet-book-page-fishing-with-peter.html (leaving the religious stuff out). I wanted something simple where the fish would stay in the water, but also be relatively easy enough to catch. I used some tiny little magnets from a craft shop and they work well as long as I pull the fish out a little before going fishing.


The monkey and balloons page is for colour matching and I thought I'd stray from velcro and use some snap fasteners. In hindsight though, I think they'll be hard for Mia's little fingers to handle - they take quite a bit of force to pull apart. The idea for this page came from http://servingpinklemonade.blogspot.com.au /2011/01/quiet-book.html. Love love love the monkey!


The idea for this page came from http://www.sugarbeecrafts.com/2010/08/quiet-book-feature.html. I had so much fun making the dolls and clothes. I bought some tiny little pegs, which Mia will love someday, but for now they're just a bit too small to let her play with so I backed the clothes with velcro and sewed a strip of velcro under each line on the clothesline. The velcro is used anyway to stick the clothes onto the dolls.


The last page I finished was this tent page with zippers. One zipper is used for the sleeping bag (where the doll can easily be removed), and another for the tent. 


Still to come are the dog/buckle page, flowers/buttons page, letter and shape matching, and bead counting page and the grand finale of putting the whole thing together into a tidy little book!

Stay tuned!