Friday, May 29, 2015

Sewing Tutorial - Hungry Caterpillar Felt Set

This has always been one of our favourite books in our house. Our children are being brought up bilingual (my husband is German) and it's one of the few books that we have in both English and German.

From a teacher's point of view, I love the book because it teaches kids the days of the week, number sense and counting, the process of a caterpillar becoming a butterfly and, for our younger child, we even talk about colours when we read because the pictures are so bright and beautiful and those fruit pages are perfect for it.

Now, our eldest is 4.5 years old and very interested in learning about how to put a story together and how to read. And that is where the idea for the felt set has come from.


I started out by going through the book and choosing the main parts of story and the most important pictures. I then sketched these. I made each item double layered and added any trim on top of this. It makes them stronger (to last longer) and not as floppy (for more effective play).


I then cut out fabric for a case in which to keep the set together. You could make any size that you prefer, this just fit the zippers I had available at the time. I used clear vinyl PVC for the front of the case and a cute hungry caterpillar quilting cotton that I bought some time back. To keep the seams neat through the PVC, I cut a double layer of cotton, put right sides together and sewed around the rectangle, leaving a gap to turn to out the right way (so that front and back are showing the fabric design on the right side, and all seams are hidden inside). After turning it out the right way, I attached the zipper to the front and back as in the above right picture.


With right sides of the front and back together, I sewed around the edges, opened up the zipper and turned the case out the right way to finish with the above case. 


But back to the felt set....I placed all layers as I wanted them when finished and sewed around each edge, a few millimetres in from the edges. 


Saturday, May 23, 2015

Sewing tutorial and pattern - Balloon cover

These covers were one of those things that I had seen around and thought was such a great idea. "One day I'll make some of those...". When I finally got around to experimenting and going through with it last week I couldn't believe I had put it off that long! So easy and fast. And they have been the number one toy here with both Mr 2.5 and Miss 4.5 since I finished them. We love balloon covers!

You will need two contrasting fabrics and the pattern (available here).

Cut six of the curved strips on the fold, and three of the hexagons on the fold.


And now start sewing. Choose one of each fabric and place them right sides together. Sew down one side only. Now take a new piece and place it right sides together with the contrast fabric. Sew down the next side. Take another new piece and place it right sides together with the contrast fabric. Sew down the next side. Repeat, repeat, repeat until there are no curved strips left. Place the two open sides right sides together and sew down to join.


Prepare the ends for sewing. Place two of the hexagons with right sides together. Pin a line through the centre across the hexagon. Sew from the outer edge inwards, leave a gap (approx 4cm) and then sew through to the other outer edge.

Fold down the pieces so that you now have wrong sides together and right sides showing.

Top stitch a few millimetres from the centre line on both sides to secure and to reinforce the slit that has now been formed in the middle of the piece.

Pin the hexagons into the ends of the ball, right sides together and sew along to enclose the ball.


Poke a deflated balloon through the opening at the end, keeping enough on the outside to blow the balloon up. Blow up the balloon, tie off the end and tuck it in.


Sewing tutorial and pattern: Mermaid dress up tail for kids

We love dress ups at our house. Little by little I've been adding to the kids' collection of costumes for play.

I wanted to make Miss 4.5 a mermaid tail that would grow with her and not be too tight at the ankles that she wouldn't be able to walk or play in it. 

You can download and print the pattern for the fin here.

First, choose your main fabric. I wanted something shiny, so I went for this sequined fabric. You'll need a rectangle - it should reach from your child's waist to the floor (length) and wrap around their body with a 15cm overlap (width). You can allow a little extra for hemming. Hem around the rectangle - I rolled approx 0.5cm over, then rolled over again and sewed along.


Cut two mermaid fins on the fold. Optional is to also cut iron on interfacing to iron onto one of the fin pieces to make the fin a little firmer.


Place right sides together and starting at the top right, sew around the edges, finishing at the top left. The fin can be sewn to the skirt along the bottom.

For fastening the waist, sew velcro along the waistline.


I trimmed the edging of the fin with some of the left over sequin fabric, but it is totally optional.

Sewing Tutorial: Putting together your Quiet Book pages to make a book

You've spent hours cutting out little felt shapes, positioning them on pages, sewing, stitching on faces and finishing touches and now you have the pages all made for your Quiet Book. Well done! It's no easy task. No doubt plenty of patience, glasses of wine and cups of tea have passed between you and your Quiet Book pages. So let's take a look at one way to put it all together and make a book out of what you've got in front of you.


Work out the order of your pages and then pair them up in front to back pairs. Put them right sides together. Sew around with approximately 1cm/0.5 inch seam, leaving a gap wide enough for turning out the right way. Trim the corners as in the picture below.


Turn out the right way and push the corners out to neaten. It should look something like this:


Then sew a top-stitch a few millimetres from the edge to neaten it off and close off the opening.

Covers can be made in the same way (you'll need front and back covers):

  • right sides together
  • sew around, leaving an opening
  • trim corners
  • turn out the right way
  • topstitch edges
I like to add a button tab to my cover. The length and width depend on the thickness and size of your book. Cut two rectangles, allowing a 0.5cm/0.25 inch seam and follow the same steps as above.


Of course there are loads of options for putting your pages together, but my favourite way is to use binder rings. I then sew two buttonholes on each page where I want to place them. Easy! Especially if your sewing machine does automatic buttonholes as mine does :-)


Thursday, May 21, 2015

Sewing tutorial: Quiet book pages - Bead counter

This is one page I really like to include in my books. Both of my kids love counting and one of their favourite pages in their quiet book is the bead counter. They enjoy moving the beads across, and they also learn their colours by practicing with the beads. It is an easy and effective page.


The starting point for making the page is deciding how wide to make the counter (then cut your thin ribbon in appropriate lengths), to what number to count to (in my larger books, I have include counters that go up to ten), and finally what colours to choose. 

The ribbon I use is very narrow and I do not like to take any chances with safety with beads coming loose, so my first step is to space the ribbons on the page and sew them to the page background. My green felt is about 1.5cm wide, so I sew along the ribbons for about a length of 1cm on one side first. Then I thread my beads on and sew down on the other side to secure the ribbons down and lock the beads in. 

Place the felt lengths over the ribbon ends where you have sewn and pin down. Sew a stitch around the edges. Finally trim off the threads and ribbon ends and your bead counter is done!


Monday, May 18, 2015

Sewing tutorial: Quiet Book pages - Clothesline and dress up doll


When I first made this page for my daughter's Quiet Book almost three years ago, I decided to combine a clothesline with dressing dolls. It is a great idea for a velcro page and she has really loved playing with and dressing up the doll.


The clothesline page is made up of felt, ribbon and velcro. The first step is to sew down the velcro and ribbon strips. Cover these with the brown felt strips and sew around the edges to fasten in the sides of the ribbons and velcro and to hold down the clothes line poles. The last step is to sew the grass down over the top.


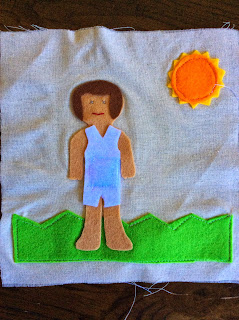
The doll page is made up of felt, velcro and some embroidery. The grass should go down first. Then attach the body felt. I like to use an adhesive backing (Heat n Bond Lite), made for applique. To use this, trace an outline of the body, iron it onto the felt, cut out the shape around the outline, and then iron it down on the background fabric. The doll will need some hair and I like to give it some underwear. Then attach a sun in the sky. Embroider on eyes and a mouth, or you could use markers to draw them on.

I then sew a square of velcro on the tummy so that the clothing will attach.

I find it a good idea to sew around the edges of the shapes to secure them down so that they withstand repeated pulling when your children are pulling off the clothing.


The clothing can be as plain or as decorative as you choose. I like to keep mine fairly plain. The adhesive applique paper can be helpful again for drawing out the outline of each piece of clothing. Use the body as a guide as you want to cover all of the body and fit the arms and legs. Draw the clothing outlines onto the paper and iron on a neutral colour felt which will serve as backing. Sew on velcro and then iron on the clothing coloured felt. Again, sewing around the edges will make the items last long and withstand all that velcro action.