Showing posts with label page. Show all posts

Saturday, May 23, 2015

Sewing Tutorial: Putting together your Quiet Book pages to make a book

You've spent hours cutting out little felt shapes, positioning them on pages, sewing, stitching on faces and finishing touches and now you have the pages all made for your Quiet Book. Well done! It's no easy task. No doubt plenty of patience, glasses of wine and cups of tea have passed between you and your Quiet Book pages. So let's take a look at one way to put it all together and make a book out of what you've got in front of you.


Work out the order of your pages and then pair them up in front to back pairs. Put them right sides together. Sew around with approximately 1cm/0.5 inch seam, leaving a gap wide enough for turning out the right way. Trim the corners as in the picture below.


Turn out the right way and push the corners out to neaten. It should look something like this:


Then sew a top-stitch a few millimetres from the edge to neaten it off and close off the opening.

Covers can be made in the same way (you'll need front and back covers):

  • right sides together
  • sew around, leaving an opening
  • trim corners
  • turn out the right way
  • topstitch edges
I like to add a button tab to my cover. The length and width depend on the thickness and size of your book. Cut two rectangles, allowing a 0.5cm/0.25 inch seam and follow the same steps as above.


Of course there are loads of options for putting your pages together, but my favourite way is to use binder rings. I then sew two buttonholes on each page where I want to place them. Easy! Especially if your sewing machine does automatic buttonholes as mine does :-)


Monday, May 18, 2015

Sewing tutorial: Quiet Book pages - Clothesline and dress up doll


When I first made this page for my daughter's Quiet Book almost three years ago, I decided to combine a clothesline with dressing dolls. It is a great idea for a velcro page and she has really loved playing with and dressing up the doll.


The clothesline page is made up of felt, ribbon and velcro. The first step is to sew down the velcro and ribbon strips. Cover these with the brown felt strips and sew around the edges to fasten in the sides of the ribbons and velcro and to hold down the clothes line poles. The last step is to sew the grass down over the top.


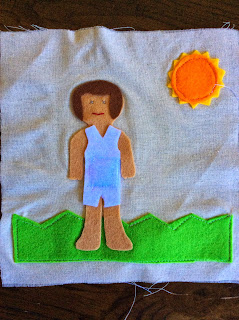
The doll page is made up of felt, velcro and some embroidery. The grass should go down first. Then attach the body felt. I like to use an adhesive backing (Heat n Bond Lite), made for applique. To use this, trace an outline of the body, iron it onto the felt, cut out the shape around the outline, and then iron it down on the background fabric. The doll will need some hair and I like to give it some underwear. Then attach a sun in the sky. Embroider on eyes and a mouth, or you could use markers to draw them on.

I then sew a square of velcro on the tummy so that the clothing will attach.

I find it a good idea to sew around the edges of the shapes to secure them down so that they withstand repeated pulling when your children are pulling off the clothing.


The clothing can be as plain or as decorative as you choose. I like to keep mine fairly plain. The adhesive applique paper can be helpful again for drawing out the outline of each piece of clothing. Use the body as a guide as you want to cover all of the body and fit the arms and legs. Draw the clothing outlines onto the paper and iron on a neutral colour felt which will serve as backing. Sew on velcro and then iron on the clothing coloured felt. Again, sewing around the edges will make the items last long and withstand all that velcro action.


Sunday, March 22, 2015

Sewing Tutorial: Quiet Book page - Old McDonald had a barn and some finger puppets

The barn page is page three of my Quiet Book. I adapted the idea from the template on Homemade By Jill (http://homemadebyjill.blogspot.com.au/2009/07/quiet-book-templates.html).

STEP ONE
You will need red, white and brown felt. Draw each shape on the transfer paper - red barn, brown window, white stripes and two brown rectangles the size of the barn doors. Iron the paper onto the felt and cut out the shapes. Cut between the doors and fold them back. Iron on the brown rectangles to the back of the doors. Peel off the rest of the paper, leaving the adhesive on the back of the shapes. Iron shapes onto the page fabric, starting with the red barn, then the brown window and finally the white stripes.


STEP TWO
Cut out the finger puppet shapes. Fasten on the noses and cow spots. Embroider some eyes on all and nostrils on the pigs. I usually fasten down each piece by sewing a top stitch so that it doesn't fall off. Sew the ears, horns etc onto the back piece of each finger puppet and then sew the fronts and backs together.


STEP THREE
Sew top stitch around each piece of the barn and white edging to be sure it does not come off. Cut another piece of brown felt to fit inside the doors and hold the finger puppets in place.Sew it down on the sides and bottom.


Done!

Put it aside and get ready to prepare the next pages!