Friday, June 10, 2016

Pinterest - Most Recent Pins - Sewing for Girls

Pinterest is my all time favourite social media tool. It's perfect for sewing, and even more perfect for the procrastinating sewist like myself. During the busy times when I don't have the time to sew, I can usually at least put aside 5 or 10 minutes to add to my pin boards.

My most viewed pin board is Sewing for Girls, due to a little tutorial I pinned on there from this blog about three years ago for a Toddler Pinafore Dress. It now has almost 26000 repins and 2000 loves on Pinterest and brings a lot of traffic to this blog too.

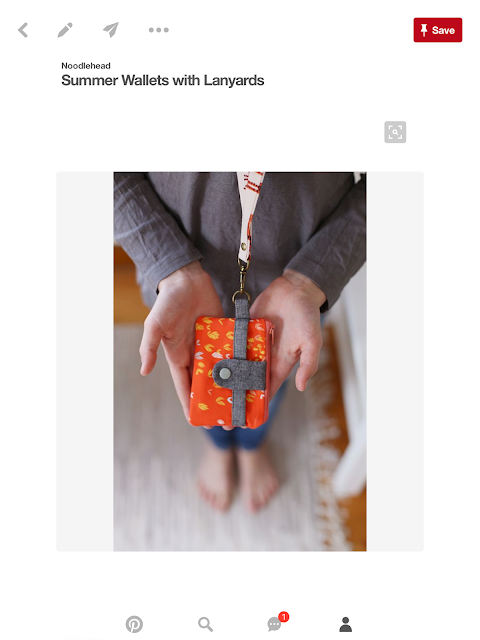
Here are my most recent five pins on the Sewing for Girls board:


I've actually already started making two of these, one each for my daughter and son. They love to choose their own fabrics and watch the process unfold as the fabric is transformed into something they can use/wear. These little wallets will be perfect for trips to the library with their new library cards and little shopping trips.


Geranium Dress (by Made By Rae)


Rainbow Dress Tutorial (by Made by Rae)


Easy DIY Swim Cover Up (by It's Always Autumn)

Happy Sewing!

The Massive Sewing Room Declutter (Konmari Inspired)


decluttering-book-2-d112046.jpgLast year I read The Life-changing Magic of Tidying Up, written by Marie Kondo.

I'm not about to claim that the book changed my life, but it did give me a way to start tackling the clutter that was bothering me in our compact little house. There were a lot of things in the book that went a little overboard, but mostly it worked for me. And I'm pretty sure that it's reduced the amount of daily tidying that I do around the house.

She suggests cleaning out by category, and this was useful. I pulled all of my clothing out of the cupboards and went through each item one by one, bagging up those clothes that no longer spark joy to send to a charity store. I did the same in my kids' rooms and then tackled their toys. I adopted her suggestions for organising clothing in the cupboards and this has made a huge difference! The hanging clothes do look lovely sloping upwards, but more than that, storing folded clothing upright in the drawer makes it so easy to find things.

I went through the bathroom drawers and then the kitchen cupboards. More bags and boxes were taken to the charity shops. The kitchen bench became uncluttered, as did the kitchen table. Old cables got thrown away and papers were shredded. Whole shelves in the study nook just off our living room were cleared out and the kids suddenly had a storage place for all their puzzles and board games.

And still the sewing room loomed. I actually wish I'd taken a before picture of the sewing room, because the transformation was huge. I culled fabrics that I would never use, then sorted the remaining ones so they were stored upright. Then I organised all the categories of craft supplies into their own little place - buttons, ribbons, crochet hooks, knitting needles, threads, safety pins, beads, etc. One of Konmari's suggestions is to reuse containers for storage rather than buying storage. In the process of cleaning out I found some of my pottery that I'd made in my time living in Japan, some cute tins that had come with soaps as presents, and some other boxes that had come via online shopping orders. Perfect for storing sewing supplies, and I especially love seeing the pottery pieces out of the cupboard being used now.

This room had been one of my big problem areas and required at least a weekly tidy up. The clutter in there had often stopped me from sewing. Now I have space to set up my iPad with a good TV show, set down a cup of tea and spread out my projects, so the decluttering process has definitely improved my sewing and crafting time.

With two young children in the house, as well as work and other commitments, carrying out the whole process throughout my house has taken several months and I'm still not finished. But I'm currently savouring the last phase of decluttering - the photos. The whole process has been very reflective and brings with it lots of memories (both good and difficult), but sorting through the last 15 years of photos, which include six years of working and travelling my way around the world and five years of motherhood is bringing me lots of joy.
Sunday, December 27, 2015

Baby Doll Swaddle - Pattern and Tutorial - Easy DIY


You will need:

  • Approx 0.5 metres/ yards of a print fabric for the main fabric.
  • Approx 0.5 metres/ yards of a plain lining fabric for the inside of the swaddle. 
  • Approx 0.5 metres/ yards of a light wadding, such as Pellon fleece.
  • Velcro
  • Small scraps of felt for heart decorations.
  1. Start by printing the three pages of the pattern and cutting out the pattern pieces along the solid line. The pattern pieces for the main part of the swaddle will need to be joined together along the dotted line, by matching and then taping the two pieces together.
  2. Place pattern pieces with the marked straight edge along the folded edge of the fabric and cut out one piece in each of the two fabrics (main and lining), as well as the wadding.
  3. Depending on the wadding used (and following the directions for the wadding type), iron the main fabric over the wadding piece to secure.
  4. Begin by sewing the darts into the separate fabrics. Fold over the fabrics along the centre line of each dart and sew along the outer line to create shape in the foot pocket and top part of the swaddle.
  5. Then take the two pieces of lining fabric, right sides together, and sew together around the round bottom edge. Repeat for the outer fabric. Snip along the curved seams and turn one of the fabrics out the right way.
  6. Place this piece inside the other, so that right sides are together. Now join the two fabric cases together by starting in the middle of the top seam and sewing around all of the edges, leaving a space of about 4cm (1.5in.) as you return to where you started.
  7. Trim all corners and curved edges and turn the swaddle out the right way. Iron the seams flat, especially where the opening is at the top seam.
  8. Top stitch around all edges, closing up the opening at the top seam.

9. Pin a strip of velcro to the position indicated on the pattern for the foot pocket. Sew this down and sew the matching velcro to the flap that you prefer to fold down first (on the inside). Then sew two small pieces of velcro onto this same flap, but on the upper side and the matching velcro to the underside of the flap that will fold down last (see picture above for velcro placement).

10. Finally, attach your felt shape (be imaginative to match your fabric, or to suit your child's preferences here!) to the top flap.


Tuesday, December 22, 2015

Simple Rainbow Ribbon Skirt Tutorial

Miss 5 loves rainbows. Her first drawing that resembled anything was of a rainbow. Since then, we have had rainbow beetles, rainbow birds, people wearing rainbow clothes and more feature in her drawings.

I saw a skirt somewhere online that had bias binding strips along the bottom to create a rainbow effect, but as I am always on the lookout for the most simple and effective ideas, I thought I would replace the binding with grosgrain ribbons.


To start, I measured my daughter's waist and doubled the measurement. That gives you the width of fabric needed.

I then measured the length from her waist to where I wanted the skirt to end (in her case that was just on her knee). I added around 4 - 5cm and that gave me the length of the fabric needed.

Open out the rectangle and fold over the bottom edge by about a centimetre and iron down. Pin the ribbons along the skirt. The bottom one serves as the hemline and the spacing is dependent on personal preference really and how many colors you choose to use. Sew the ribbons down by sewing along both edges as close to the edge as possible. To finish off at the ends, fold the ends under and sew down.

Fold the rectangle with right sides together and sew down the open side. Then press the top over 2cm and then another 2cm. Sew along the bottom fold as close as you can to form the elastic casing. Leave an opening of about 2 - 3 cm and feed the elastic through. Sew the ends of the elastic together and sew the casing closed.

Oh so cute!


Monday, November 2, 2015

Party Bag Coloring Activity - Tutorial

My five year old daughter loves coloring in. She has had an obsession with it now for about 3 or 4 months, since just before her fifth birthday.

A while ago I bought a whole lot of this Tidny fabric from IKEA. Sadly they are not stocking it anymore in our local store. But it is seriously amazing and I'm hoping that they will replace it with something just as amazing (if not more so).

Anyway, I had this idea for her fifth birthday party - little party bags that each of the kids could color in themselves and then I would fill them with goodies as they leave to go home.


I cut a rectangle out of the Tidny print and another of the same size from a plain cotton fabric for the back. Placing the front and back fabrics with right sides together, I sewed along the sides and the bottom.


To make the drawstring casing, I cut a rectangle from the plain fabric that was two centimetres more than twice the length of the top of the rectangle and around 4cm wide. I folded the ends over by 1cm and ironed down, then folded the strip in half lengthways and ironed it down. I pinned the long folded plain fabric along the top edge of the bag (right sides together) and sewed along. Folding the plain fabric up on the right side, I sewed a top stitch along near the top of the Tidny print fabric to finish off.

Thread a drawstring or ribbon through the casing and admire the cute little bag!

A huge hit with the five year olds!

Kids can color the bag with fabric markers and by applying heat with an iron to the colored in area (place baking paper or similar between the fabric and the iron), the colors will last longer.


Tuesday, September 15, 2015

Sewing tutorial: Kids dress up ideas - firefighter

This is all you will need to make your own firefighter dress up costume:

  • a long sleeved red shirt (I bought mine from a thrift store)
  • felt - bright yellow and grey/silver
  • thread, pins etc.
The first step is to cut strips of felt. The strips of yellow felt should be approx 8cm/3in and the grey will need to be about 2.5cm/1in.


Pin the grey felt to the centre of the yellow felt and sew along both edges of grey felt, in a few millimetres.

Then pin your strips in place on the shirt - the top strips will be placed level with the arm pit of the shirt and then the next strips down about halfway. Sew along both edges a few millimetres into the yellow felt.


Simple, but very effective!

Monday, September 14, 2015

All about me!

In the Riches and Roses sewing room it is rarely about me. It is usually all about sewing for my children and making kids' items for my etsy store. But a month or so ago I went through my fabric stash and found some fabrics that I wanted to put to use for myself.

Peppermint is an excellent magazine that I love to read when I can find or make the time. Their website has some really great free sewing patterns available with comprehensive instructions. This top that I made is called the Harvest Top (http://peppermintmag.com/other/sewing-school/) and it was easy to make. Just be aware that the size estimate is quite generous and the shoulders can end up quite loose. Mine has needed some adjustment.


This little A-line skirt is still in need of a hook and eye at the waist, but it's as good as done. I based it on one of the many free tutorials that are available online. I love a pattern that is based on measurements and a formula, rather than cutting out a million paper pieces to stick together, so this was perfect. I chose to use bias binding for the waist, but you could use facing instead. I had a new little bias binding tool to try out :)


This little top was super simple and just based on a picture I saw on Pinterest. I'm still a bit nervous about cutting into stretch fabric without a pattern, so I used an old T-shirt as a model and cut a paper pattern off it. It turned out a great fit.


I made a great top (or 2) from a free pattern I found online ages ago at https://blog.colettehq.com/news/free-pattern-to-download-the-sorbetto-top. I decided to play around a bit with the pattern to make a dress out of some red linen fabric I had in my stash and trim it with a Japanese style cotton. I love the result. It was a bit lumpy in the front, so I also made a belt to go with it.


The picture doesn't look like much with the top laying flat, but this top is very sweet and so comfy. I followed the tutorial at http://morningbymorningproductions.blogspot.co.nz/2012/09/gathered-dolman-sleeve-top-tutorial.html and was really happy with the result. The drape is really flattering.


After all of that selfish sewing, it's time to get ready for the upcoming warm weather and make some shorts and skirts for my kids.