Wednesday, April 25, 2012

Finished!

I actually finished it a few months ago, but it's taken me a while to get around to posting these pictures of the completed book. It was a great feeling to finally put the book together!
Page 1- matching with velcro and magnetic snaps
Because of all the pieces that are just held on by velcro, I thought it best to enclose everything with a zipper. The cover is also interfaced with a light interfacing, and lined with a plain calico fabric. I sewed on loops on the inside to hold the rings. I wanted to use rings so that it would be easy to take pages out and add new ones later.
Pages 2 and 3 - matching with snap fasters, tying a bow
Pages 4 and 5 - fasteners and finger puppets
To put the pages together, I ironed about a centimetre over on each edge and pinned each page back to back with another, then top stitched around the edges. As I had already interfaced each page with a light-medium interfacing, this worked well. For the binder rings, I sewed two small button holes on each page.


Pages 6 and 7 - dress the dolls - velcro

Pages 8 and 9 - fishing with magnets, tent and sleeping bag with zippers

Pages 10 and 11 - matching/using buttons, a page for Mia's car

Pages 12 and 13 - bead counting and potato head

Page 14 - Potatohead pocket
I still find it hard to believe how many hours and how many materials went into making this book. We're saving the book now so that it's a new toy when we fly to Germany in less than two months time.

Thursday, February 9, 2012

The Quiet Book

In June we're going to Germany so that Mia can meet her family on her daddy's side. Two adults and a 19-month old on a plane full of people for a total of 20 plus hours. Not really anyone's idea of a holiday, but I'm hoping that preparation is the key. I did some reading about how to keep a toddler occupied while travelling and found some great ideas about activity bags and quiet books. Although most ideas in quiet books are aimed at children who are slightly older, I thought I'd give one a go in the hope that she (and us, and the rest of the passengers on the plane) might get some benefit out of it. 

Planning the quiet book was loads of fun. As was drawing the designs and playing with a pile of coloured felt. I decided on 12 activities in the end and bought a few metres of calico, some light fusible interfacing, felt in a bunch of colours, and some fusible webbing used for applique. 

I cut out rectangles of calico in the size I wanted (27cm by 31cm) and backed each piece with interfacing slightly smaller so that the seams won't be too bulky when I put together the pages. I wanted to interface each page to make the pages sturdier, especially when sewing the felt pieces on.


Then I worked page by page, drawing the designs in reverse on the iron on applique webbing. This has also helped to make things a lot sturdier, and the finished product a lot neater. As I don't want to risk any of the felt pieces falling off, I've sewed around each, but the applique webbing just gives it a nicer finish.
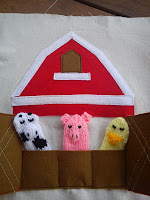
Once I'd collected all the materials for the pages and done some ironing on, I tackled the barn page. I got inspiration and a pattern from  http://servingpinklemonade.blogspot.com.au/2011/01/quiet-book.html  and used red, white and brown felt, ironing on each piece and then reinforcing by sewing around them. I'd knitted the finger puppets ages ago and never done anything with them and figured they were perfect for the barn. 

Next I made the potato heads. I took some ideas from http://www.oopseydaisyblog.com/2010/05/mr-potato-head.html. Shown here is Mrs Potato Head, and I also made accessories for Mr which fit to the same potato. All of the removable pieces are double sided to make them more durable


The fishing page was fun... I took ideas from  http://shannonmakesstuff.blogspot.com.au/2010/07/quiet-book-page-fishing-with-peter.html (leaving the religious stuff out). I wanted something simple where the fish would stay in the water, but also be relatively easy enough to catch. I used some tiny little magnets from a craft shop and they work well as long as I pull the fish out a little before going fishing.


The monkey and balloons page is for colour matching and I thought I'd stray from velcro and use some snap fasteners. In hindsight though, I think they'll be hard for Mia's little fingers to handle - they take quite a bit of force to pull apart. The idea for this page came from http://servingpinklemonade.blogspot.com.au /2011/01/quiet-book.html. Love love love the monkey!


The idea for this page came from http://www.sugarbeecrafts.com/2010/08/quiet-book-feature.html. I had so much fun making the dolls and clothes. I bought some tiny little pegs, which Mia will love someday, but for now they're just a bit too small to let her play with so I backed the clothes with velcro and sewed a strip of velcro under each line on the clothesline. The velcro is used anyway to stick the clothes onto the dolls.


The last page I finished was this tent page with zippers. One zipper is used for the sleeping bag (where the doll can easily be removed), and another for the tent. 


Still to come are the dog/buckle page, flowers/buttons page, letter and shape matching, and bead counting page and the grand finale of putting the whole thing together into a tidy little book!

Stay tuned!

Saturday, December 31, 2011

Mia's backpack

After making myself some clothes, I thought it was time to switch back to making stuff for Mia. In an earlier post, I mentioned Nicole Mallalieu's book, 'You Sew Girl'. I love this book! Some of the instructions are a little complex, but there are some gorgeous projects in there.

Another sewing project to mentally prepare myself for something was this little backpack for Mia to take to childcare when she starts soon. Actually, we've used the bag heaps already to take along with us when we go out - it's the perfect size for a change of clothes, sunscreen, hat, drink bottle, snacks and some little toys or mini books for her to play with if we need to keep her occupied somewhere.

I love that the straps are adjustable - as Mia's not really ready to wear a backpack around just yet, it means I can lengthen them to fit me and keep my hands free.


Sewing for myself at last...


Late in 2011 I went back to work. A few months before, I thought I would mentally prepare myself by sewing myself some new work clothes. I found a great pattern online for a dress http://selfishseamstress.wordpress.com/2010/05/07/a-frock-by-friday-coffee-date-dress-explosion/ and then found this fabric through an etsy seller for a bargain price (even after factoring in the postage from the US). The colour hasn't shown up very well in the pictures - it looks a little washed out here. Anyway I thought it would make up into a unique kind of dress. I was very happy with the finished product. Not being one for frills and such, I left that part off the dress and kept it plain. I figured that the fabric was enough decoration anyway. The picture of the dress really doesn't do it justice - it looks heaps better on.

The next on the list was this super easy top posted on Sew Mama Sew. I used the fabric to the right for this one and it turned out really cute. With a white camisole underneath it works well.

Next was this red and white print dress. I used wide ribbon for the shoulder straps as strapless doesn't really work for me. I used elastic thread and found the waistline difficult to keep straight. I'm not completely happy with the fit of a dress, but I've worn it a few times with a short sleeved bolero and it looks okay.
This top to the right looks absolutely nothing in this picture - it's another one that really needs to be shown being worn to see how it fits and falls. I made it from instructions from the book 'You Sew Girl' by Nicole Mallalieu. I was especially excited to finally learn how to bind sleeves on stretch fabric.
Another pattern from Nicole Mallalieu's book, I loved making this panel skirt. I had bought the bird print fabric for another project that I hadn't ended up doing and only bought a fat quarter, so I improvised a little with the panel and binding. I was so happy with how this turned out - it is a perfect fit!  There wasn't actually a pattern for it, instead there was a complex formula based on different measurements and then you cut out a circle based on this. Such a great skirt to wear too.


Tuesday, October 4, 2011

The forgotten sock monkey

Shortly after my last post I remembered this little guy, who I've also made in the last few months. There are so many tutorials for sock monkeys, but I kinda followed this one: http://www.craftbits.com/project/sock-monkey. So simple to make, and a bargain too! I found these socks on sale for AU$2 and already had all other supplies in my sewing cupboard. Mia loves him, and especially loves the tail. As she  puts everything in her mouth, I opted for sewn on eyes and saved the buttons to put on later. The bow is in a tight double knot so that she can't take it off. When I was looking for patterns, I found a whole zoo worth of other sock animals, so might have to try another one soon.

I've also been making hair clips for Mia, but am a bit afraid of the E6000 glue that I ordered for it - there are so many worrying warnings on the label, I'm not sure I want to put anything that contains it in her hair. I've just bought a glue gun and have more ribbons on order, so stay tuned...

Tuesday, September 27, 2011

Spring has arrived


Spring arrived suddenly here in Brisbane. One day it was cold, and the next we were woken by the loud sound of birds in the park and creek next to our house. Sunshine, blue skies and colourful birds made me want to sew Mia some more summery clothes. I'd bought both of these fabrics a few months back when all of the sales were on and hadn't realised they were both full of birds. Coincidentally, since then our little Mia has become obsessed with birds. Although I'm not sure it classifies as a word yet, she makes the /b/ sound every time she hears or sees a bird, and at times even manages to get out the first part of the word... "bir"..."bir". I'd been wanting to try a reversible dress and had been eyeing off this design for a while. On one of my many trips to the fabric store, there happened to be a half price sale on patterns. It turned out very cute, but the sizing is a little big, so is a bit big for her yet. Can't wait for her to grow into it .

For the second outfit, I found this cute little cherry fabric on ebay and picked up a fat quarter for a few dollars. Just enough fabric to make this little top, using the same pattern as I used for the Yui Kokeshi dress. I made the bloomers from the reversible dress pattern, and they also turned out pretty big, but together these look very cute on my little one. 


 I've also been working on some Christmas presents:


A remote control and gadget holder for the couch from http://sewing.about.com/od/homedecprojects/ss/armchairorganiz.htm in this cute fabric I found at a wholesaler.


These tote bags made from some cute tea towels and a stationery organiser.


I'm in the process of making a few other gifts in preparation for Christmas, and having located some of the wool I needed for Mia's blanket, I'm madly trying to get that finished in time for her birthday. The next new project sometime soon will be some hair clips. Looking around to buy some for Mia, I couldn't believe how expensive they were. I ordered all of the supplies online and could easily make about 50 or more of them for less than what four or six would cost to buy... all supplies have now arrived, so I'll probably start on those in the next few days. I hope she'll keep them in after all that effort :-)


Sunday, August 28, 2011

Knitting, bean bags and my first proper doll

August has been a busy crafting month. After going back to the knitting for a bit, I got through a lot of Mia's blanket and then ran out of the main wool. I posted a picture on my last blog entry - there's a colour stripe sequence and between each colour a few rows of light brown in garter stitch. Sadly no one seems to stock that wool anymore in that colour. I have an excess of the pink from another project, so at least I could finish the blanket with a border in pink if it comes to that.


I've also started knitting a wrap top in a purple wool that I bought on sale a few winters ago. It's a cute top, but I'm not sure if the wool is suitable so it's a bit of an experiment. The pattern's really cute and can be found at http://berroco.com/exclusives/embrace/embrace.html. Will post pictures as it starts to take shape more.


This great tutorial (http://sewlikemymom.com/bean-bag-tutorial/) inspired me to make some bean bags. I'd been looking for gift ideas for one-year olds, but I ended up making them for Mia. With a short name like Mia, they're the perfect toy to pop in my bag if we're going out and she loves putting them into and out of boxes.


Some other gifts I've been working on are a simple backpack for my nephew, a stationery organiser for one of my nieces, and a couple of tote bags for another two nieces. The big project for the month though has been completing my first Waldorf doll. With Mia's first birthday approaching in November, my partner and I have wanted to give her a special doll. We've looked at loads of ugly plastic dolls in the shops and then I turned to Etsy and found loads of cute dolls and although I'd love to support another Etsy seller, "why buy something I can make myself for less than half the price" (quoted from my own mother who repeated this same question every time we went shopping when I was a child)?!?


So I searched and found this tutorial: http://doingwithout.livejournal.com/41229.html. I wasn't sure at first if I wanted a doll that was the same size as Mia, or something small that she could carry around in an Ergo-style carrier, but for my first attempt I thought I'd follow the tutorial this time and I could always make a smaller version next time.

I used a cotton interlock for the body. The feet were a challenge, but worth it to have a more three-dimensional look. The other major challenge was the head. I used an old tank top of mine for the inside of the head and it took me a couple of attempts to get the wadding into a tight enough ball. After sewing the head on, my partner I laughed as we thought that she resembled Mia quite closely. I crocheted some hair from a mohair blend that is a similar colour to Mia's hair. I'm still not convinced that it looks like hair though - she looks a bit like she's wearing a cap. The diaper pattern on the website didn't work for me - I guess it depends how you stuff the doll - so I made my own.


Being such a big doll, we worried that Mia might be scared of her - not a problem at all. Every time Mia sees her she gets excited and wants to clap with her, kiss her and cuddle her. I think they'll be great friends. As we're planning another baby sometime next year, I'm considering making a smaller version.