Showing posts with label handmade. Show all posts

Thursday, September 1, 2016

September Etsy Update

It's been a super busy month or so behind the scenes at Riches and Roses. First up, I've been preparing for Etsy Australia's #makeforgood campaign. I've got two products listed in the campaign this year and will be donating 20% of sales of these to Plan Australia's "Because I Am a Girl" program. You can find out more about this in another post here on my blog.

I have also been sorting through my products in preparation for the pre-Christmas rush and updating fabrics for some products.

I'm currently busy cutting out and putting together a new batch of these little beauties, which will come out with three new cover designs in the coming weeks, stay tuned!


I've just finished some new cases for the Hungry Caterpillar sets in a new design - see the photos in the listing for details. The new case pictures the food on this page of the book.


I've also been updating the fabrics for all of my doll accessories. There are some really sweet prints on offer at the moment.


My two new car mats have been added to the shop and they are really cute. My son especially loves his version of the racing car mat and filling up his racing cars with petrol as they do their rounds of the track. You can see more on the racing car play mat here.


Another product that I've updated is the baby doll carrier. This new one matches in with the other baby doll products in my etsy store.


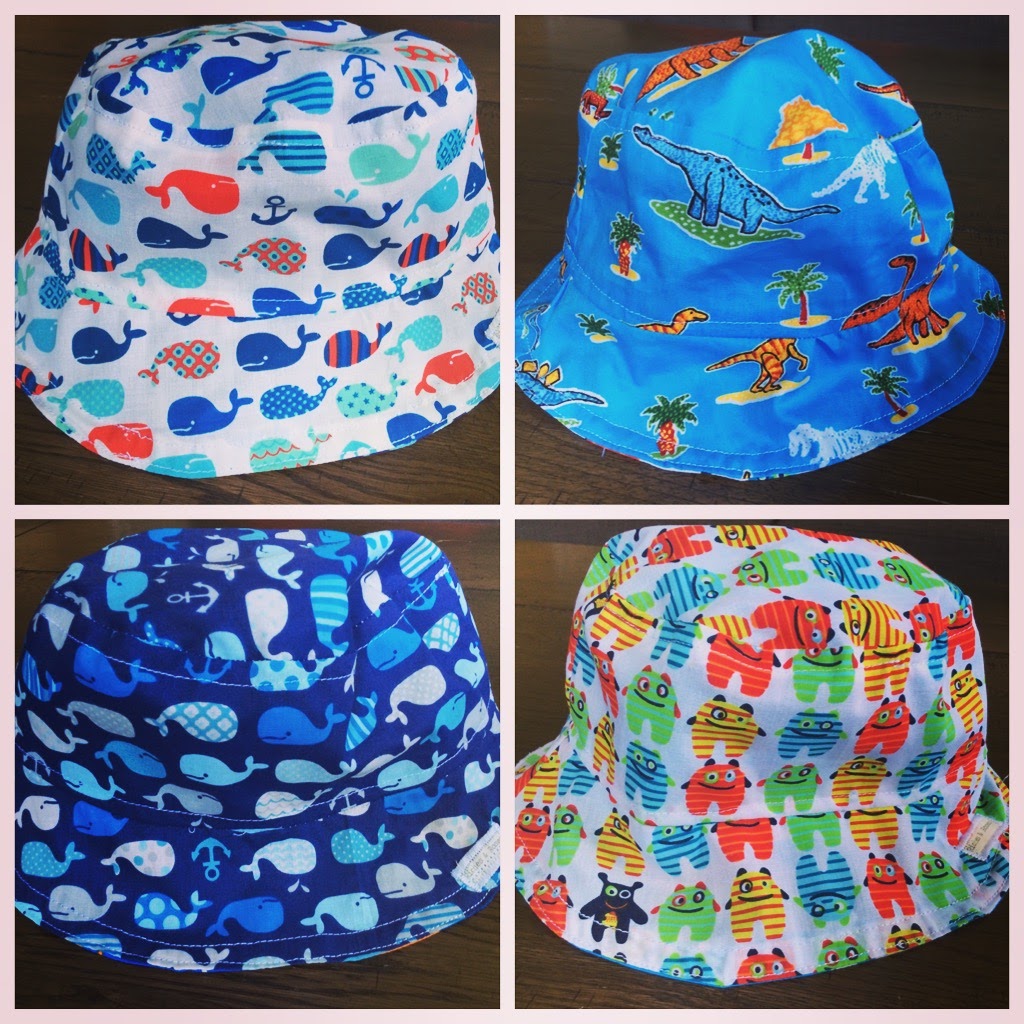
My newest product, just in time for warmer weather here in Australia is this cute little reversible kids sun hat available in four sizes to fit baby up to pre-school age.


Over the past few months, my best seller has been my cute little balloon covers which are available in two different designs. I've also updated these designs recently to include the bright owl prints and whale prints pictured below.


Busy busy busy, but never finished - stay tuned for a couple more new products that I'm working on!

Friday, July 8, 2016

Pinterest - Most Recent Pins - Sewing for Boys

I love sewing clothes for my little boy. I love making toys and play accessories for him the most, but comfy shorts and pants for play and childcare days are my favourite clothes to make for him.

Here are five of my most recent pins to my Pinterest board "Sewing for Boys".

1. Jaden T-Shorts

This idea is great - turn a favourite adult T-shirt into a pair of shorts! I love ideas that encourage re-using and upcycling.

2. Baby Yoga Pants

Along the same lines as the T-Shorts. Recycle an old T-shirt to make some comfy pants. So simple!

3. Toddler Tour Pants

Cute pants with a patchwork insert down the sides of the legs and a really easy to follow tutorial.

4. Men's Shirt Baby Romper

Along the themes of upcycling - turn a cotton button-through shirt into a summery romper for a little boy.

5. Free Boy Patterns

A great collection of exactly what it claims to be - free patterns for boys. Heaps of easy to follow and easy to sew clothing for little ones.


Please share any great finds that you have below in the comments - I would love to find more!


Saturday, June 25, 2016

Fabric Favourites

Sometimes it seems kids get to have all the fun. My son has shorts covered in little monsters, and another pair in sharks. He has pants with dinosaurs on the trim and a reversible hat with bugs on one side and vehicles on the other. 


My daughter has a skirt covered in rainbow spots and multiple items made out of different owl designs.


I shouldn't complain too much though as it can be a lot of fun shopping for kids fabric and as you can see, I'm building up quite the stash <3 <3 <3

Which one do you like the best?

Wednesday, June 22, 2016

Sewing Tutorial Quiet Book Pages - Rainbow, Butterfly, Hot Air Balloon

A few months ago a custom order came through my Etsy store. One of my most popular existing items is the Quiet Book that I sell through the store and one of the great things about it is that it is so easy to add extra pages to it as I join the pages together with ring binders.

The request was to add in one extra page (two-sided, so two extra designs) more suited to a smaller child. See the finished product below!


To make the rainbow, I cut the red (largest) semicircle first and then cut each next colour a little smaller. I then sewed the red semicircle onto the page and followed with each smaller one until I was done.

I overlapped two little light grey clouds over the bottom edge and cut out two identical pieces in a small butterfly shape. I sewed these together, inserting antennae and leaving a small opening on each side so that I could feed through the thin ribbon. When constructing the page and joining it to the previous one, I fastened in the ribbon between the pages. 

The cute little butterfly can be pulled along the ribbon to fly around in front of the clouds.


For the hot air balloon, I first sewed the blue felt rectangle onto the background page as the sky. Then I added two little white clouds and sewed on the main hot air balloon shape (here in the white with coloured spots). I attached four short lengths of ribbon to the base of the balloon cover (here in orange), and then sewed this felt piece at the top of the balloon. I attached the ends of each ribbon at the bottom and then hid the ends by sewing the balloon basket over them.


The doll is used in another page (the tent and sleeping bag page) in the book, so rather than add another, and in order to make it easier to handle for a small child, I attached a ribbon to the doll so that it could be used for both pages, and also couldn't be easily lost - double win!


Saturday, June 11, 2016

Riches and Roses Etsy Update


For a mother of two kids aged 3 and 5, who works three days a week and has volunteer commitments, my Etsy store has been keeping me busy since around last Christmas with an average of about 4 orders per month since December.

Since then, I've updated my packaging and labelling, to use this cute little label on all my items:


I've also added in some new items including these baby doll accessories:


And some of my long standing products have suddenly become very popular, especially this cute little hungry caterpillar set.


The 5 most active products in my Etsy store so far this year have been:


<3 <3 <3

Friday, June 10, 2016

Pinterest - Most Recent Pins - Sewing for Girls

Pinterest is my all time favourite social media tool. It's perfect for sewing, and even more perfect for the procrastinating sewist like myself. During the busy times when I don't have the time to sew, I can usually at least put aside 5 or 10 minutes to add to my pin boards.

My most viewed pin board is Sewing for Girls, due to a little tutorial I pinned on there from this blog about three years ago for a Toddler Pinafore Dress. It now has almost 26000 repins and 2000 loves on Pinterest and brings a lot of traffic to this blog too.

Here are my most recent five pins on the Sewing for Girls board:


I've actually already started making two of these, one each for my daughter and son. They love to choose their own fabrics and watch the process unfold as the fabric is transformed into something they can use/wear. These little wallets will be perfect for trips to the library with their new library cards and little shopping trips.


Geranium Dress (by Made By Rae)


Rainbow Dress Tutorial (by Made by Rae)


Easy DIY Swim Cover Up (by It's Always Autumn)

Happy Sewing!

Saturday, May 23, 2015

Sewing Tutorial: Putting together your Quiet Book pages to make a book

You've spent hours cutting out little felt shapes, positioning them on pages, sewing, stitching on faces and finishing touches and now you have the pages all made for your Quiet Book. Well done! It's no easy task. No doubt plenty of patience, glasses of wine and cups of tea have passed between you and your Quiet Book pages. So let's take a look at one way to put it all together and make a book out of what you've got in front of you.


Work out the order of your pages and then pair them up in front to back pairs. Put them right sides together. Sew around with approximately 1cm/0.5 inch seam, leaving a gap wide enough for turning out the right way. Trim the corners as in the picture below.


Turn out the right way and push the corners out to neaten. It should look something like this:


Then sew a top-stitch a few millimetres from the edge to neaten it off and close off the opening.

Covers can be made in the same way (you'll need front and back covers):

  • right sides together
  • sew around, leaving an opening
  • trim corners
  • turn out the right way
  • topstitch edges
I like to add a button tab to my cover. The length and width depend on the thickness and size of your book. Cut two rectangles, allowing a 0.5cm/0.25 inch seam and follow the same steps as above.


Of course there are loads of options for putting your pages together, but my favourite way is to use binder rings. I then sew two buttonholes on each page where I want to place them. Easy! Especially if your sewing machine does automatic buttonholes as mine does :-)


Wednesday, February 12, 2014

Back to the sewing machine

Life got busy. Since going back to work back in November, sewing and crafting had stopped. Although it's only been part time (2 days a week), there's been Christmas, holidays and two little children who've suddenly needed a bit of extra special care at bed times. Mr now 14 months has been going through some big separation anxiety, and Miss 3 has just been in one of those phases where she needs some extra stories and cuddles in order to go off to sleep.

But then I realised how much I've been missing it. A long list of projects was made and these hats became the first project to be ticked off the list. They're reversible which makes them so much easier to sew, and fun to mix and match the designs. I've made four different sizes in each design and they're all up in my etsy shop already.


I loved this jungle animal fabric when I saw it on sale ages ago but hadn't been able to think of any projects to make - too many little boys being born around here! It makes a nice contrast to the sea life print below, which is on the reverse side.


I first bought this dinosaur print to make a smart little collared shirt for my son to wear to his first birthday party, and ended up buying some more as it's just so cute.


I opted for robots on the reverse side. Cute, no?


My daughter had a pillowcase dress from this Hello Kitty fabric when she was just over 1 year old - I love how it looks made up as this hat!


Paired up with a nice quiet polkadot pattern on the reverse side.


Both of my kids have hats made from this collection of fabrics, although the caravan print is a new addition to my fabric stash. I wasn't sure how it would turn out, but I love the finished look.


A hat pattern and tutorial will soon follow!