Showing posts with label balloons. Show all posts

Sunday, June 21, 2015

Sewing Tutorial: Reversible Chalk Cloth Bunting


We recently had a friends wedding that we weren't able to attend. I still really wanted to send a gift and so we bought them a cute chalkboard that we could personalise with a message, and then they could erase it and use it in their house. Practical, original and fun.

And then I bought this chalk cloth fabric. I've made some portable chalkboard mats for the kids and then I thought that this was a fun idea. Bunting looks so effective and lining it with chalk cloth means that we can reuse it for lots of different occasions.

I started by cutting out triangles of chalk cloth and fabric of the same size, a little larger than how I wanted them to be in the finished product. I also decided to make my own bias binding to string them together, so I had to cut out several long strips of fabric along the bias and feed it through my bias binding maker.


Place cotton and chalk cloth together with wrong sides together. Sew around the perimeter, about 5mm in from the edges. Use pinking shears to cut along the side edges and trim the top edge with normal scissors.

Pin and string together using the bias binding, closing the ends.


Monday, March 2, 2015

Sewing Tutorial: Quiet Book Page - Monkeys and Balloons

The idea for this page came from Serving Pink Lemonade, although I've simplified it to include just the monkey and the balloons, and generally only make it with buttons and buttonholes nowadays.


STEP ONE

My previous post explains how to prepare your pages and other materials and also mentions the applique paper that I prefer to use to make the process easier.

The first step is to draw your shapes onto the applique paper.

For the monkey page, you will need:
  • monkey
  • monkey's belly and face
  • eight balloon shapes - choose four colours and make two iron on balloons of each colour. This will make four balloon backgrounds to attach to the page, and four button-on balloons.
Cut roughly around your outlines on the paper and iron on to the felt. Follow the ironing instructions for the particular applique adhesive that you choose to use.

Then cut your felt shapes out and peel off the paper layer, leaving an adhesive backing on the back of the felt shapes.


STEP TWO

Put your shapes into position on your page fabric and iron on.

For figures that have two layers (or more), such as the monkey below, do only one layer at a time. Start with the bottom layer (in this case, the dark brown monkey outline) and then iron on the next layer (belly and face in light brown). 


STEP THREE

Make the balloons. Iron the remaining four balloons onto their matching coloured felt and cut them out.


STEP FOUR

Sew around everything. You can choose to skip this step, but the applique adhesive will eventually lose its effectiveness and the felt shapes will come off, especially after repeated buttoning and play. It's much safer, and looks much neater if you sew around everything.

Start with the shapes attached to the page. Sew close to the edes with a machine stitch. For the monkey, you could choose to just sew around the belly and face as this will also secure the body to the page.
 
Also sew strings to connect the monkey's hands to the balloons. 
 
 
STEP FIVE
 
Sew button holes into your balloons.
 
 
STEP SIX
 
Do all hand sewing. For the monkey page, this will mean sewing buttons to the balloons on the page, and embroidering the monkey face.
 
When you have finished, put your page aside until you have all pages finished.
 
Well done!


Saturday, October 26, 2013

Finished - four new sets of quiet books! Instalment one: Counting

Last night I felt like I had accomplished something big. It's taken several weeks of half an hour per evening to get these eight quiet books (two in each of the four new designs - counting, alphabet, colours and shapes) finished. 

Miss almost 3 loves counting. Almost to the point of obsession at the moment. We're a bilingual family and she now manages to get to 13 in both English and German. Most numbers beyond 13 come out something that sounds a lot like sixteen. Anyway, the point of that is that her bead counter is her favourite page in the Quiet Book that I made her more than a year ago. I wanted to find a way to include one in this counting book, so I decided to just go up to five.


One shoe... two people...


And my two favourite pages: three animal finger puppets and four balloons.


And finally, five fish!


Check it out in more detail in my etsy shop: https://www.etsy.com/au/listing/167004470/toddler-quiet-book-counting-theme? and stay tuned for some patterns and instructions in the coming months.

Lesley :)


Thursday, February 9, 2012

The Quiet Book

In June we're going to Germany so that Mia can meet her family on her daddy's side. Two adults and a 19-month old on a plane full of people for a total of 20 plus hours. Not really anyone's idea of a holiday, but I'm hoping that preparation is the key. I did some reading about how to keep a toddler occupied while travelling and found some great ideas about activity bags and quiet books. Although most ideas in quiet books are aimed at children who are slightly older, I thought I'd give one a go in the hope that she (and us, and the rest of the passengers on the plane) might get some benefit out of it. 

Planning the quiet book was loads of fun. As was drawing the designs and playing with a pile of coloured felt. I decided on 12 activities in the end and bought a few metres of calico, some light fusible interfacing, felt in a bunch of colours, and some fusible webbing used for applique. 

I cut out rectangles of calico in the size I wanted (27cm by 31cm) and backed each piece with interfacing slightly smaller so that the seams won't be too bulky when I put together the pages. I wanted to interface each page to make the pages sturdier, especially when sewing the felt pieces on.


Then I worked page by page, drawing the designs in reverse on the iron on applique webbing. This has also helped to make things a lot sturdier, and the finished product a lot neater. As I don't want to risk any of the felt pieces falling off, I've sewed around each, but the applique webbing just gives it a nicer finish.
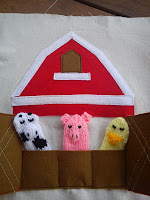
Once I'd collected all the materials for the pages and done some ironing on, I tackled the barn page. I got inspiration and a pattern from  http://servingpinklemonade.blogspot.com.au/2011/01/quiet-book.html  and used red, white and brown felt, ironing on each piece and then reinforcing by sewing around them. I'd knitted the finger puppets ages ago and never done anything with them and figured they were perfect for the barn. 

Next I made the potato heads. I took some ideas from http://www.oopseydaisyblog.com/2010/05/mr-potato-head.html. Shown here is Mrs Potato Head, and I also made accessories for Mr which fit to the same potato. All of the removable pieces are double sided to make them more durable


The fishing page was fun... I took ideas from  http://shannonmakesstuff.blogspot.com.au/2010/07/quiet-book-page-fishing-with-peter.html (leaving the religious stuff out). I wanted something simple where the fish would stay in the water, but also be relatively easy enough to catch. I used some tiny little magnets from a craft shop and they work well as long as I pull the fish out a little before going fishing.


The monkey and balloons page is for colour matching and I thought I'd stray from velcro and use some snap fasteners. In hindsight though, I think they'll be hard for Mia's little fingers to handle - they take quite a bit of force to pull apart. The idea for this page came from http://servingpinklemonade.blogspot.com.au /2011/01/quiet-book.html. Love love love the monkey!


The idea for this page came from http://www.sugarbeecrafts.com/2010/08/quiet-book-feature.html. I had so much fun making the dolls and clothes. I bought some tiny little pegs, which Mia will love someday, but for now they're just a bit too small to let her play with so I backed the clothes with velcro and sewed a strip of velcro under each line on the clothesline. The velcro is used anyway to stick the clothes onto the dolls.


The last page I finished was this tent page with zippers. One zipper is used for the sleeping bag (where the doll can easily be removed), and another for the tent. 


Still to come are the dog/buckle page, flowers/buttons page, letter and shape matching, and bead counting page and the grand finale of putting the whole thing together into a tidy little book!

Stay tuned!